“set the state of a led upon the reading of a digital value”
- when the button is pressed, the LED is lit;
- when the button is pressed, the LED does not light up.
To communicate with external elements in the Arduino UNO controller, there are 14 digital pins. Each of them can be defined by the program as an input or an output.
The digital output has only two states, high and low. A high state corresponds to an output voltage of about 5 V, a low state is 0 V. The output allows connection of the load with a current of up to 40 mA.
When the pin is defined as an input, after reading its state, you can determine the voltage level at the input. At a voltage close to 5 V (actually more than 3 V), a high state corresponding to the constant HIGH will be read. At a voltage close to 0 (less than 1.5 V), a low state, or a constant LOW, will be read.
We have to connect the LED to the output, defining it as an output, and the button is connected to the pin with the input mode.
The LED is connected via a current limiting resistor. Here is a typical scheme.
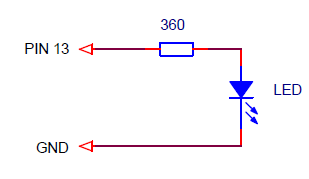
The limiting resistor is calculated by the formula I = U output – U drop on the LED / R.
Uoutput = 5 V, U drop on the LED can be taken equal to 1.5 V (more
accurately indicated in the technical specifications). It turns out that
in our circuit the current through the LED is set at 10 mA.
You can choose any output, but I suggest using the LED installed on the board for ease of connections. The one that blinked in the first test example. It is connected to digital pin 13. In this case, you do not need to connect an additional LED to the board.
“Lo sketch commentato”
To store the intermediate state value of button, we created a buttonState variable with the boolean type. This is a boolean data type. A variable can take one of two values: true or false. In our case, the LED lights up or does not glow.
Copy or rewrite the program code in the Arduino IDE window. Download to the controller and check.
To save Arduino projects, I created the folder d:\Arduino Projects\ Lessons\Lesson_pushbutton. In each lesson I call programs: pb_1, pb_2, … You can do the same or come up with your own system for saving files.
Program block:
// read the state of the 12 input (button) and write to buttonState
buttonState = digitalRead(12);

// invert variable buttonState
buttonState = ! buttonState;

// write state from buttonState to output 13 (LED)
digitalWrite(13, buttonState);
can be written without using the intermediate variable buttonState.
digitalWrite(13, ! digitalRead (12));
The digitalRead() function acts as an argument to the digitalWrite() function. A good style is just such an option. No additional variables are required, less text.
Those. function can be used as an argument to another function. Functions can be called from functions.
Another version of the same program that uses the conditional if statement.
// The LED lights (pin 13) when the button is pressed (pin 12)
void setup () {

// determine pin 13 (LED) as output
   pinMode(13, OUTPUT);

// determine pin 12 (button) as input
   pinMode(12, INPUT_PULLUP);
 }

// endless cycle
 void loop () {
   if( digitalRead(12) == LOW ) {
      digitalWrite(13, HIGH);
   }
   else {
      digitalWrite(13, LOW);
   }
 }
In an infinite loop, the state of pin 12 (button) is checked, and if it is low (LOW), a high state (HIGH) is generated at pin 13 (LED). Otherwise, the LED status is low (LOW).
“the #define directive”
In all examples for input/output functions, we set the argument pin, which determines the output number, in the form of a specific number – a constant. We remembered that the constant 12 is the number of the output of the button, and 13 is the number of the output for the LED. It is much more convenient to work with symbolic names. To do this, in C, there is a directive linking identifiers with constants and expressions.
The #define directive determine the identifier and sequence of characters that is substituted for the identifier, each time it appears in the text of the program.
In general, it looks like this:
#define name string_characters
If in our programs we write:
// the number of the LED output is 13
#define LED_PIN 13
then every time the name LED_PIN appears in the program, it will be substituted the symbols 13 during the translation. The function of turning on the LED looks like this:
digitalWrite(LED_PIN, HIGH);