Here we look at using serial communication on the Arduino. Serial UART is one of the various ways an Arduino can communicate with other devices. This includes a host PC and using the Arduino serial monitor is communicating with the PC using serial UART.
INDEX
Arduino Serial Monitor
End Of Line Characters
Formatting output using the tab command
How fast is serial
Different Arduino Serials
Hardware Serial/Serial
SoftwareSerial
AltSoftSerial
NeoSWSerial
Using a software UART and usb adapter to talk to a PC
Buffer Size
Serial Commands
Arduino Serial Monitor
This is a basic example of displaying text in the serial monitor. Connect the Arduino to a PC, upload the following sketch, open the serial monitor and be amazed…
// Basic serial print example
// Example 1

void setup() {
    Serial.begin(9600);
    Serial.print("Hello World");
}

void loop() {
}
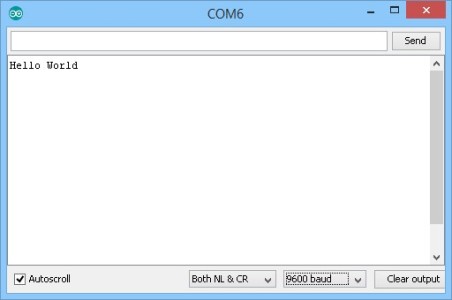
After uploading the sketch, open the serial monitor. If you see the “Hello World” message you have everything set up correctly.
If you do not see the “Hello World” message you need to figure out what is wrong. If you managed to upload the sketch I think we can safely assume the Arduino is connected to the computer. This means it is likely you have the wrong baud rate selected.
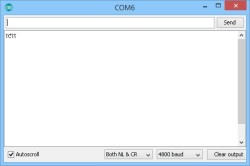
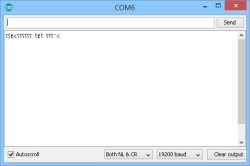
Here a baud rate of 4800 and also 19200 has been set. You can see that garbage characters arise. This kind of output in the serial monitor is indicative of a baud rate mismatch.
If the mismatch is large you may not get anything at all.
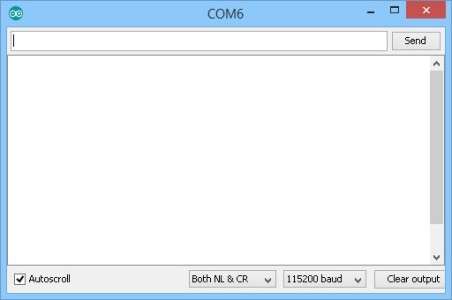
When using serial communications you need to make sure you are using the same baud rate at both ends. So how do you know what baud rate to use? It is the value you use when you begin the serial channel.
Serial.begin(9600);

This tells the Arduino to open a serial channel at 9600 baud rate.It
is actually telling the Arduino to open a hardware serial channel but we
will get to that a little later. You then select the same value in the
serial monitor.
Why 9600? No reason. There are many different rates I could have used. The important thing is to use the same speed at both sides.
End of Line Characters
If you print two strings you will see that they appear together on a single line.
// Basic serial print example
// Example 2

void setup()  {
    Serial.begin(9600);
    Serial.print("Hello World");
    Serial.print("Another string");
}

void loop()  {
//empty loop
}
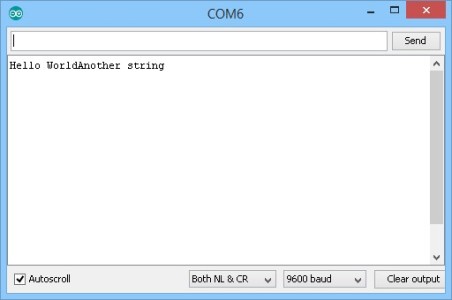
This is because we didn’t tell the serial monitor to start a new line after the “Hello World” message.
There are two line end characters; new line and carriage return. These
are non visible, non printable characters that act as controls telling
the serial monitor to go to the start of the next line. There are two
ways we can add the end of line (EOL) characters
1 – add “\r\n” to what we are printing, or
2 – use Serial.println()
Both produce the same results and Serial.println() simply adds the “\r\n” characters to what it is printing.
// Basic serial print example
// Example 3

void setup()  {
    Serial.begin(9600);
    Serial.println("Hello World");
    Serial.println("Another string");
}
void loop()  {
// empty loop
}
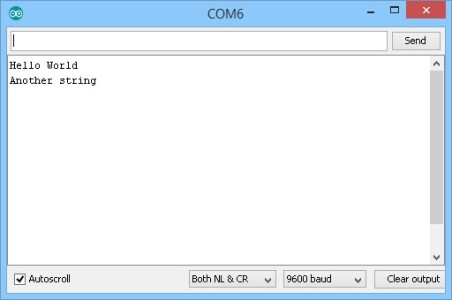
Using Serial.println() the EOL characters are added and the two messages are displayed on separate lines.
On a Windows system:
\r (Carriage Return). Moves the cursor to the beginning of the line without advancing to the next line
\n (Line Feed). Moves the cursor down a line without returning to the beginning of the line
\r\n (End Of Line): Combination of \r and \n
Serial monitor: Formatting output using the tab command
For quick and easy formatting spaces can be used but the output can become messy when the data has variable lengths. A better solution is the tab command “\t”. This works in exactly the same was as tab works in a word processor; it moves the cursor over to the next column and lines up the output.

Serial Commands
If you look at the Arduino reference for serial you will see that serial has the following commands available:
begin()
end()
If (Serial)
print()
println()
write()
availableForWrite()
read()
readBytes()
readBytesUntil()
available()
setTimeout()
find()
findUntil()
parseFloat()
parseInt()
peek()
flush()
serialEvent()
It is very possible to produce very complex serial sketches and not use the majority of the serial commands. I have used about 5 of the above commands only. Commands like find() and findUntil(), I prefer to create my own routines that perform similar functions but without blindly deleting data (more below). Having said that I do feel it is useful to have an understanding of the commands and how they work.
begin(baudRate)
You have already seen above, begin() is used to start or enable serial.
Serial doesn’t work unless you initiate it. The program will compile OK
but nothing will be sent out over serial. Remember to use the same baud
rate at both ends.
Serial.end();
end()
end() closes or disables serial. For hardware serial this is not
normally required but can be used if you ever need to use the RX and TX
pins for other things after using serial. The serial RX and TX pins,
Pins D0 and D1, can be used as regular pins when not using serial. I
can’t think of a reason why you would want to do this though. If you
need to use pins 0 and 1 then you are highly unlikely to use them for
serial communication.
end() can be useful when using software serial. You can implement more than one software serial but can use only one channel at a time. This means you need to open and close channels as you want to use them.
// wait for the serial port to connect
    while (!Serial) {
        ;
    }
If (Serial)
Checks to see if serial communication is available but take care, on
most Arduinos Serial always returns TRUE even if you have not initiated
the serial channel.
This command is only useful when used for the Leonardo (which has a usb
CDC connection) and works as you may expect; TRUE when serial is
available and FALSE when it is not. It does not work with Serial1 on the
Leonardo which always returns TRUE. In the examples above you may have
noticed
// Serial_Example 003 print v write
void setup() {
    Serial.begin(9600);
    Serial.println(123);
    Serial.write(123);
}

void loop()  { }
This is just for the Leonardo and waits for serial to be available before continuing..
print(), println() and write()
I have already mentioned the difference between print() and println().
println() adds carriage return and new line characters (\r\n) and
print() does not. But what does print() and println() actually do and
how are they different to write()?
According to the Arduino reference
Serial.write() writes binary data to the serial port.
Serial.print() prints data to the serial port as human-readable ASCII text.
This sounds fairly straight forward but there is more to it that that and isn’t all data binary anyway.
print() and write() may at first seem to be the same but there are some key differences. print() and println() convert all numeric values to human-readable ASCII text. write() doesn’t convert anything. It simply sends what you give it. This makes write() more efficient and faster than print/println().
What is the difference between binary and human-readable ASCII text? It is the difference between the value 1 and the character that represents a 1. IE ASCII 48 which is “1”.
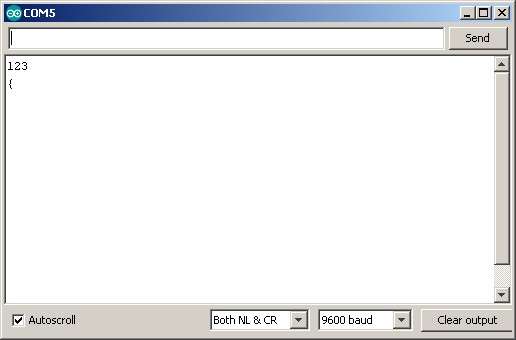
Serial.print(123); displays “123” in the serial monitor (3 characters). The value 123 is converted to the ASCII characters “1” + “2” + “3”. Serial.write(123) sends a single byte with the value of 123. (123 is the ascii code for the “{” character so Serial.write(123) displays a “{” in the serial monitor). This seems straight forward but Serial.write() can handle strings. Serial.write(“123”) sends the ASCII characters “1” + “2” + “3”, this is because you are giving a string to the write command not a value. Sometimes it is easy to mix up string representations of numbers and actual values. “1” and 1 are not the same.
void setup() {
    Serial.begin(9600);
// wait for the serial port to connect. Required for Leonardo native USB port only
    while (!Serial) {
        ;
    }
int value = 65;
    Serial.println(value); // print as an ASCII-encoded decimal
    Serial.println(value, DEC); // print as an ASCII-encoded decimal
    Serial.println(value, HEX);  // print as an ASCII-encoded hexadecimal
    Serial.println(value, OCT);  // print as an ASCII-encoded octal
    Serial.println(value, BIN);  // print as an ASCII-encoded binary
}

void loop()  { }
If you are not familiar with the ASCII table it is worth looking up. A good place to start is www.asciitable.com.
As you can see there is some overlap between Serial.print() and Serial.write. For example; Serial.print(“HELLO”) and Serial.write(“HELLO”) results in the same thing, “HELLO”. There are differences though, they handle numbers differently, print() can handle more data types, and has a built in base convertor.
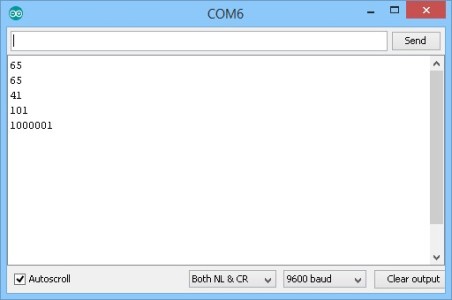
Serial.print() can be used to display values in different base formats. For example as Hexadecimal or binary.
float f = 3.1234;
Serial.print(f);
What happens if you use Serial.write(value);? I will leave this to you to find out.
read()
reads a single character or byte from the serial input buffer. Data
received over serial is stored in the buffer until the sketch reads
them. If the buffer is empty read() returns -1
You can see an example of this is the serial pass through sketch above.
// Read from hardware serial and send to software serial
    if ( Serial.available() ) {
        c = Serial.read();
        softSerial.write(c);
    }
if ( Serial.available() ) – Check to see if data is available. Serial.available() returns the number of bytes in the buffer. Any value > 0 is classed as not FALSE. I am using it here as a check to make sure we have at least 1 character of serial data before trying to read it.
parseInt()
parseInt() returns the first valid ascii formatted (long) integer number
found in the serial buffer. Characters that are not integers (or the
minus sign) are skipped.
parseInt() runs through the serial buffer looking for characters that could be part of an integer. When looking it will delete any non numeric character until it finds an integer. If it does not find a valid value it will empty the buffer, time out and return 0. If an integer is found any characters/data after the integer are left in the serial buffer. If the buffer only contains a valid integer, parseInt() will read the available data and then wait for the timeout before returning the value. This can cause performance issues.
If the buffer contains “12345” then parseInt() returns 12345 and the buffer will be empty.
If the buffer contains “abd1234zxy”. parseInt() returns 1234 and the buffer will contain “xyx”. The “abc” will be deleted.
If the buffer contains “-3434\r\n”. parseInt() returns -3434 and the buffer will have “\r\n” after the function has finished.
It is worth highlighting that parseInt() returns a long, which in Arduino land is a 4 byte value. parseInt() will work if you use an Arduino int (which is a 2 byte value) as long as the value is < 32,767 but you will run in to problems if the value is > 32,767 because when the long is copied to the int it will lose 2 bytes and so the value will change. For example; the signed long value 2147483640 gets truncated to -8 when converted to a signed int.
long parseIntValue = Serial.parseInt();
Always copy the return value into a long variable.
parseFloat()
Serial.parseFloat() returns the first valid ascii formated floating
point number from the serial buffer. The function returns empty handed
(0) if a floating point number is not found or the timeout is reached.
The data does not need to be in the buffer at the time the function is
called but the function will block your code while it waits for data to
arrive.
parsefloat runs through the serial buffer deleting non floating point characters (non-numbers and non-minus sign) until it finds a number or minus sign. It then reads the floating point data until it reaches another non float character. It then converts the ascii formatted value in to an actual floating point value.
Arduino Serial Part 2: Serial Data
In the previous post I went through the basics of using serial on an Arduino and ran through the different commands. In this post I want to talk about different types of serial data and some of the things you should consider before starting to create code. The type of communication you use or can use will depend largely on the project but there are things that can be considered before starting.
- Type of communication? 1-way or 2-way
- Type of data? Values or strings? Simple or complex?
- How much data and how frequent? A couple of values every few seconds or a high rate continuous stream.
- Is the data critical? Must you be sure you receive all the data or can you afford to lose some of it.
Type of communication
The type of communication will determine how complex parts of the project are. One way communication is generally easier to implement but you need to consider which way; sent from the Arduino or sent to the Arduino. The Arduino does not have high level data processing functions so if you have complex data patterns you will need to create code that parses it.
Two way communication means you need to send and receive at both sides. Will communication be synchronous or asynchronous? This will effect your code and what functions you can use, for example, Software Serial on the Arduino cannot receive and send at the same time.
Type of data
Think about what information you need to pass and if you can simplify
the data format used to do it. For example, if you just want to switch a
light on and off you can do this with very simple codes or commands
like a single character (or even one bit of an 8 bit character).
If you are creating a weather monitoring station, you may need to
accommodate wind speeds and temperatures which may need floating point
values.
If you have a lot of different values you will need some way to let the Arduino know which is which when they are received.
You also need to consider how quickly you need to send/receive the data.
If speed is not an issue there are no real restrictions on how complex
the data can be and you could use human readable data like XML or
something like “Temperature=24.75,humidity=34.5%” for example. If data
is received very quickly then it should be as simple as possible.
As always, I advocate keeping things as simple as possible and I
always try to simplify the data, or more specifically the format of the
data, I use.
For complex data where speed is not the main concern I use formatted
data sets and if possible fixed length data. How much you format the
data can depend on what the data is.
When sending data to the Arduino I almost always stick to the same methods; I use fixed length data and use ascii for numbers. When sending data to high level languages such as App Inventor or VisualBasic it is less important but formatted data makes things easier.
Fixed length data
To give an example of what I mean here are a couple of examples. If I
have 3 sliders in App Inventor used to control a RGB LED connected to
an Arduino, I know I have 3 values (red, green, and blue) and each value
can be anything from 0 to 255.
Using ascii, where the numeric values are converted to alphanumeric
(string) values I will use 3 characters for each value; 0 becomes “000”,
100 becomes “100” and 255 becomes “255”. I may then enclose the data
within start and end markers so that the actual data becomes
“[100000255]”. Then on the Arduino side, as I receive data I add it to a
buffer, when the buffer has both a start marker and an end marker I
know I have all the data. This makes the data easy to read but it does
mean the transmission is slower than it needs to be. When speed is
important I may reduce the data to “[” byte1 byte2 byte3 “]” where
byte1, byte2, and byte3 are the actual numeric values. I would still use
the start and end markers though.
How much data
You also need to consider how much data you want to send and how often you want to send it. There is quite a difference between sending a temperature once a minute and streaming music. If you want to send a lot of data very frequently you also need to consider latency and how quickly the Arduino can receive and process data.
For example, using software serial on an Arduino has a limit to how fast you can reliably receive and send data. Hardware serial is much better but still has limits.
Critical data
If the data is critical and you have to know you have received everything then you need a way of checking. There are many different ways of doing this but, as always, I like to keep it simple if I can. In the few cases where I wanted to know for sure I have received everything I used a basic checksum value and a count of the number of times data has been sent and appended the count to the data. This means, if I get a block of data and the checksum is not correct I know it is corrupted and can request a resend. If every block of data is numbered; block1, block2, block3, I have a simple way of checking that I have received every block and if one is missing it can be resent.
The next couple of posts go through methods for sending serial data from one Arduino to another. In all the examples I use physical wires to connect the Arduinos but the wires can be replaced by any wireless module that speaks UART such as Bluetooth modules. And although I give examples of Arduino to Arduino, the same techniques can be used when receiving serial data from any device.
Arduino Serial Part 3: Getting started with serial communication
Up to now I briefly talked about different data formats and how I recommend keeping things as simple as possible. With this is mind for a first project let’s create a simple blinking LED. We will have one Arduino controlling an LED on a second Arduino. Controls to turn the LED on or off will be sent via serial from the first Arduino to the second Arduino. This is as basic as it gets. Arduino Blink by remote control. The LED has only two states so simple control codes can be used and to start I am using 1 of on and 0 for off.
That’s it for this part. Everything so far should give you a decent introduction to serial data and how to implement it in your own projects.
End Of Post


