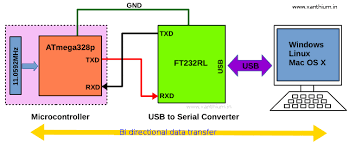
When you upload any sketch to the Arduino board, stare at the board as the codes get uploaded bit by bit, you will see two SMD LEDs on the board flicker, those two LEDs flickering shows that serial communication involving Transmit TX and Receive RX is going between the Arduino and your computer. The process is called serial communication.

First of all, we have to understand that using arduino is all about talking and sharing signals. Through its various GIOP, arduino takes in inputs and brings out outputs.
To communicate with some sensors, actuators and the computer itself, Arduino requires a communication protocol. Communicating with the computer, Arduino uses a serial communication protocol called USART or UART via USB-to-TTL serial conversion chips like the FTDI integrated circuit EEPROM named FT232.
Arduino Communication With a PC:
Arduino communication with a PC is a half-duplex communication. This means that both devices can transmit information to each other but not simultaneously. When arduino is transmitting, the PC will be receiving, and when the PC is transmitting, arduino will be receiving, but not both at the same time.
We are going to setup two circuits where:
- Arduino will be sending information to the computer to be printed on the computer serial communication window.
- Another one where Arduino will receive some real-time data from the PC serial communication console and prompt the arduino board to perform an action, here, the action will be to turn on an LED.
Arduino Sending Data to the Computer:
To setup the circuit you need the following:
- Your PC with arduino IDE installed
- Arduino UNO board
The circuit connection needed for this setup is simply plugging the Arduino into the PC via a USB cable. With the Arduino IDE already installed, all you need to do is open the Arduino IDE and write the sketch.
This way, the Arduino is communicating with the PC as the transmitter, while the PC is the receiver. To confirm this, as data is being sent to the PC from the Arduino via the USB cable every second, you will see that the yellow TX LED blinks every second; that is to show that the Arduino is transmitting. TX means transmit while RX means receive.
Arduino Receiving Data from the Computer:
In this exercise, we are going to talk to the Arduino using the computer’s keyboard, display the information on the serial monitor and use the typed data to turn ON and OFF the Led.
Using the same circuit we used for the previous exercise, all you need to do download the code below in your Arduino IDE and upload.
Arduino Communication with Python Programming Language:
Python is a very powerful programming language. You can do a lot with python, especially when you start programming Raspberry pi and in Robotics. To have your Arduino board communicate with python programming language requires that you install python integrated development environment (IDLE) on your computer; I will assume you have that already, else download Python and install. Comment below if you need assistance or a tutorial on installing Python.
We require the following python programming tools for this project;
End Of Post


